Archive for the ‘after’ Category

Dining room pendant

Monday, June 16th, 2008

Do you remember that awesome vintage Nelson Bubble Lamp I thrifted for $6? I sure do…it was my greatest thrift find EVER.

I love it so much I wanted to hang it in all its glory in the dining room. Here is what used to be there:

Yuck, a cheap mission style ceiling fan from Home Depot. I hate ceiling fans.

With some brute strength and good old fashion finagling we got that sucker down and were left with this…


Yeah! Another monster hole. The previous owners loved to dig giant holes in the ceiling.

Here it is getting prepped for install. I did the unthinkable. I cut the plug so I could make it a hardwired installation as opposed to a plug in…the SHAME.

I had to buy a medallion and a cap cover at the Home Depot. To get the pendant to stay at the desired height, I tied a knot in the cord inside the cap cover. Quick, cheap, and easy.

All in all I spent about $20 on the whole project – $6 for the lamp, $11 for the ceiling medallion, and $5 for the cap cover. It took about an hour and was pretty painless.


BEFORE and AFTER action:


Its a subtle and small, but I really like it! I always imagined a saucer shaped bubble lamp, but this will do. Now since the newly installed bubble lamp is so white and the walls are so white – I’m thinking of painting the walls in the dining room a color – like a medium gray, or a funky wall paper, or Kelly green. It just never ends.

Closet

Monday, June 16th, 2008

FINALLY!
I finished the closet this weekend. Well, that’s a lie, it is almost done. I still need to touch up paint and put bar pulls on the upper cabinet. But for now it looks pretty complete. Here’s the closet progression over the last few months.


And just to emphasis the HORROR that was the master bedroom…a few more lovely shots of the paint job before we moved in. It took 3 coats of Kilz and 3 coats of Behr Ultra Pure White to cover that mess. You can also see where we refinished the floors (both bedrooms had the wood floors painted white! I’m not sure why – the wood was in great shape.)

Some BEFORE and AFTER hotness:


Oh yeah, it feels good to be a gangsta.

Heres some more AFTER shots cause I just can’t stop myself…

Fireplace

Friday, June 13th, 2008

I’ve been obsessing about what to do with the fireplace. This is always bad news when I start focusing like a laser beam on a flaw in the house. I can’t eat, I can’t sleep, all I see are fireplaces.

Here are some inspiration images that I’ve been thinking about…paint is a cheap and easy solution.


(via. Design*Sponge & Design*Sponge)

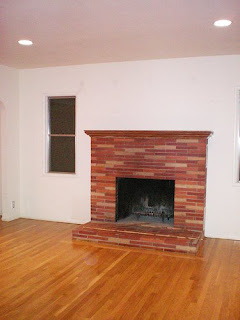
Below are some older shots of the fireplace after we refinished the floors and painted, but have yet to move in…notice the weird vents on the side. I HATE them and would like to make them disappear.

Just for kicks…

Right BEFORE we moved in and just AFTER. (It looks even worse now – like some sort of crazed flea market. What a mess!)

I think I want to take the leap and paint the brick. As is, it looks very traditional and the bricks do have some staining and paint on them already – I feel so guilty slapping paint on perfectly good brick that I need to justify. Also, that ugly mantel is very traditional, very very small and very very very boring.

Some more retro inspiration.


(via Sunset, Home Atlanta)

So any ideas? I’m leaning towards painting the brick a semi-gloss charcoal gray and beefing up the mantel and painting it a glossy white…and then stacking cut firewood inside the fireplace cause I’m super trendy.